We’ve covered the ASTM G57 soil test and IEEE standard grounding test on the blog before. In many cases, these standards will be your go-to solution for your soil test/grounding project. However, in some cases—the ASTM or IEEE tests show too high values so grounding wells need to be installed for power systems. Dry and arid soils typically found in desert environments can often produce these kinds of results.
In order to get a more accurate reading of the soils, you can test soil samples in a soil box from a core system which will be more accurate at the depths needed. The sample would be from the depth of the well to confirm a grounding well. Basically, direct samples from soil boxes—if sampled well and measured correctly—are more accurate and provide more details for the small volume they represent than a surface measurement like ERT or a sounding. Soil box tests aren’t only used in dry environments, but other cases are rarer.
Previous Quick Tips:
- Electrode Preperation and Removal
- Improving Contact Resistance
- Depth of Investigation for Electrical Resistivity
- Keeping animals away from your survey cables
The resistivity of any material is defined as the resistance in ohms (Ω) between opposite faces of a unit cube of that material. If R is the resistance of a block of conductive material having length (L), in a cross-sectional area (A), then the resistivity (ρ) is expressed by the formula:

Resistivity, being a fundamental property of material, is independent of the volume. The unit for resistivity is Ohmmeter. Resistance, however, depends upon the shape and the size of the specimen. The unit for resistance is Ohm (Ω). Our soil resistivity test box is designed so that the readings shall be multiplied by a factor 101 to give result in Ωcm
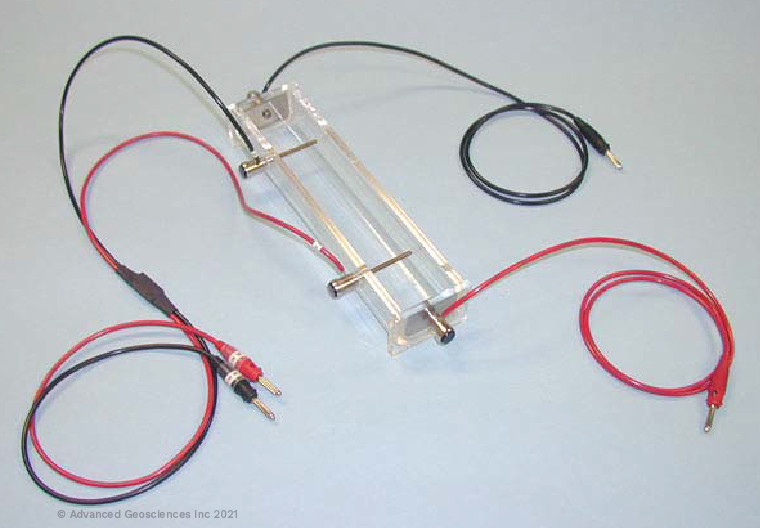
Above: An AGI Soil Test Box that can be used with the SuperSting or MiniSting
Equipment
The equipment we're using in this example is:
- The SuperSting
- A SuperSting Adapter Box
- A soil resistivity test box with cables and voltage divider
- A straight edge
- Four insulated test leads
- Water (tap and distilled)
Sample preparation
Soil samples should be representative of the area of interest. Where the stratum of interest contains a variety of soil types, it is recommended to sample each type separately. It will also be necessary to prepare a mixed sample. The sample should be reasonably large and thoroughly mixed so that it will be representative.
The resistivity of soils is to a large degree a function of moisture content. Therefore it is important to protect the samples from drying during storage/transportation by wrapping them in plastic sheet or putting them in plastic bags. Measurement should be taken as soon as possible after sampling and as soon as possible after removing them from their container/wrapping.
Unscrew and remove temporarily the two potential terminals (brass pins) to facilitate filling the soil box. The soil should be well compacted in layers, with air spaces eliminated as much as possible. Fill the box and level off the top with a straightedge. Replace the two potential brass pins.
The measured resistivity is depending on the degree of compaction, moisture content, constituent solubility and temperature. The effect of variation in compaction and moisture content can be reduced by fully saturating the sample before placing it in the box. When possible, use ground water from the sample excavation for saturation. Otherwise use distilled water. If the soil resistivity is expected to be below 10,000 Ωcm, local tap water can be used without introducing serious error. Some soils absorb moisture slowly and contain constituents that dissolve slowly, and the resistivity may not stabilize for as much as 24 hours after saturation.
The saturated measurement will provide a "worst-case" resistivity and can be usefully compared with "as-received" resistivity measurements. Surplus water should not be poured off as this will remove soluble constituents.
Measurement procedure
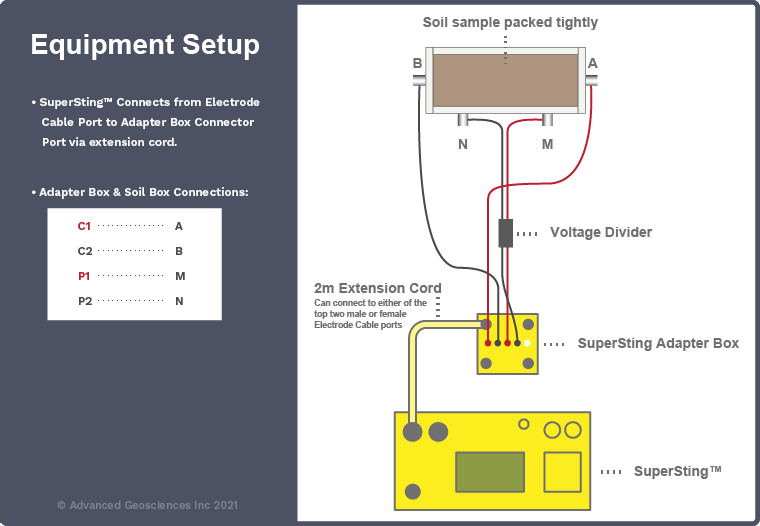
- Connect the SuperSting to the SuperSting adapter box. Then, connect the terminals of the soil box, with the voltage divider, delivered with the SuperSting soil box, connected to the M and N terminals of the adapter box. Note that because of the voltage divider the result has to be multiplied with the factor 101 in order to give the result in Ωcm.
- Go to menu 6/1 and set the measurement settings to the following recommended settings:
- Cycles: 2
- Max error: 2.0
- Max repeat: 1
- Max current: 1 or 2 mA
- Measure time: 1.2 s
- Separate potential OFF
- Measure mode: RES
- Address Table: Use Address Table
- Press MEN twice to get back to the main menu.
- Go to menu 2 and select array type: 1 Resistance.
- Select 2. to create a data file where to store the result.
- X and Y is used for coordinates when performing resistance measurements in the field, but can be used to identify different soil samples in the lab situation.
- Press the measurement key (MEA) and note the result on the display. This result has to be multiplied by a factor 101 to give the result in Ωcm (even though the display will not show cm). Also note the unit prefix, for example k Ω for 1000 Ωcm (kilo Ωcm).
Cleaning
The soil box should be thoroughly cleaned between measurements in order to avoid contamination by previous sample. It is easy to disassemble the box and clean, first with tap water then rinse with distilled water.
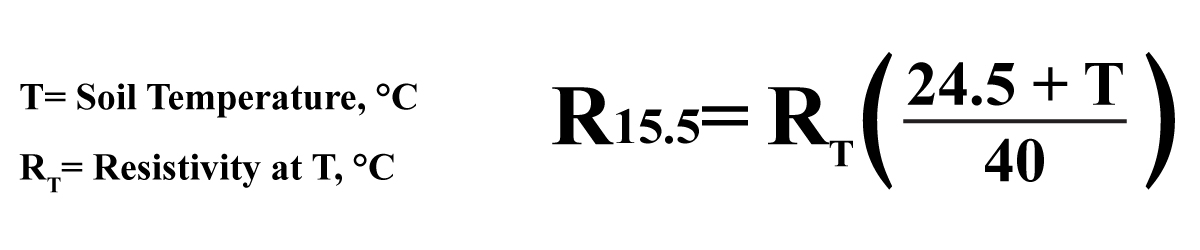
Temperature correction
The resistivity of soils is a function of temperature. In order to obtain results which best agree with field conditions, the sample should be at the same temperature as would be experienced at the test site.
Correction to 15.5°C (60°F) is recommended if the sample temperature exceeds 21°C (70°F).